Thursday, October 16, 2008

Photo Tip #9: Motion Blur


Hello ... and long time no see. Or write, and I do apologize. Is it really October? I nearly missed by Dad's birthday this week ... time flies when we don't pay attention. And there isn't enough of it to be wasting it - time that is.

Yesterday around 5:00, after an afternoon of staring at the computer while the beautiful fall sun was shining something amazing, I grabbed the camera for a quick stroll along the Riverwalk. Now, I know that my colleague Shannon Szwarc does wonderful work on the Chattahoochee with sweet shots of kayakers and skateboarders and birds hanging out on the rocks (see his blog at http://riverwalkingcolumbus.blogspot.com/), but I decided to quickly photograph the kayakers anyway - to show how shutter speed can be used to allow for 'motion blur.'

If you have a subject that is motionless, or you tell your subject to remain motionless, you can slow your shutter speed to allow other elements in the frame to be in motion long enough to create a blurry motion around the subject. These guys weren't quite skilled enough to stay motionless as they surfed the white water -- but then -- that's what they were practicing, so I can't complain.

The first shot was taken at 1/30th of a second. You can see the white water has a smooth appearance. The guys were resting. Go slower though, using a tripod, for an even smoother, almost ethereal feel. I didn't have a tripod with me, and I can't hand hold a long lens at 1/20th or slower.


The second shot is at 1/80th of a second. The kayaker is moving too fast to be 'captured,' or stopped, by that slow of a shutter speed. And the water just looks blurry. The shutter speed is too fast for the water have a smooth feel, and too slow to be crisp. It's too slow to 'stop the action.' And I might have some camera shake.


The third shot is at 1/125th of a second. I caught the kayaker as he is momentarily motionless on the wave. You can see that the water is becoming a bit more sharp. Obviously, to stop fast moving water and capture crisp splashes and droplets and waves, we need a fast shutter speed. The faster the better. Start at least with 1/500, but 1/1000 or faster is better.


Which is the shutter speed that Shannon used to shoot this last kayaker. (Something distracted me, and I didn't go back to shoot at 1/1000. My bad.) Notice the water splashing off of his face, and the streams and drops off of the paddle. Stopped, or frozen, movement.

Now remember, as you increase your shutter speed, you must decrease your aperture to keep an accurate exposure. And as you open the aperture, you lose depth of field -- so stay tightly focused on the subject. Or increase your ISO, which will then give you more shutter speed at small apertures, or a smaller aperture for greater depth of field if you so desire. So, this also became a quick review on how ISO, aperture and shutter speed work together.

Shoot some waves!
Robin

Thursday, September 18, 2008

Photo Tip #8: Shoot Vertical


As a follow up to yesterday's photo tip about cropping your photos -- think about shooting vertical. Just turn the camera ninety-degrees and get an entirely different view of things. But don't go vertical just to go vertical. If the image looks awkward, out of context, unbalanced or just plain bad - don't shoot it.

But some visuals are simply suited to be composed, and then experienced, vertically. The obvious example is basketball -- it's a vertical sport. But another obvious shot might be someone whose entire body is the picture -- meet John Bush of Phenix City who auditioned for American Idol in his work shorts and boots. I loved this shot!


Portraits can be beautiful either horizontal or vertical -- but when shooting horizontally, you must consider every single detail that is in the frame, because it either adds or detracts from your subject. Environmental portraits tell a story. Vertical portraits tell a story as well, with beautiful, tight, images of people. It's cropping in the frame -- ridding the image of all the nonessentials.


When thinking artistically -- think of the vertical frame like a vertical canvas -- and paint away!!


Robin

Tuesday, September 16, 2008

Photo Tip #7 - Cropping Your Photos

First -- my apologies for missing two weeks of photo tips. We'll catch up this week, and start with tips for CROPPING PHOTOS, and discuss why we crop photos.

Cropping a photo is about composition. Whether you crop a photo to get rid of extraneous material (cut out the visual junk), or you crop a photo because you later see that it turns your good picture into a stunning picture -- we're talking about the composition of the image. Like good writing or good music, the first draft is rarely the last draft. Initially, we want to shoot the best negative (or digital file) that we can - exposure, depth of field, focus, etc. - but seldom is the raw image the final image (unless you're taking snapshots to hang on the refrigerator and not the living room wall). Among other darkroom techniques (old-school or digital), cropping is one of the basic tools used in composition. Your photo can become an entirely new picture. It can draw the observer's eye to the essence of the image.

Let's start with cropping out the junk. First, try to take out as much of the unnecessary and unwanted distractions as you can while you shoot. Crop within your camera as much as possible. Move in closer to your subject. Look closely at what is creeping into the sides (including top and bottom) of your frame. Find a different angle, shoot from higher up, shoot from down low, shoot vertical, seat your subject, whatever it takes to keep odd stuff from creeping in. (As well, you want to clean up the background -- more on clean backgrounds later.) Moving closer or using a longer focal length lens, using your zoom, is a good start.


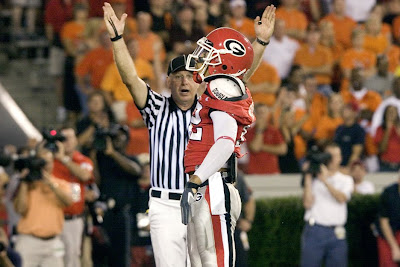
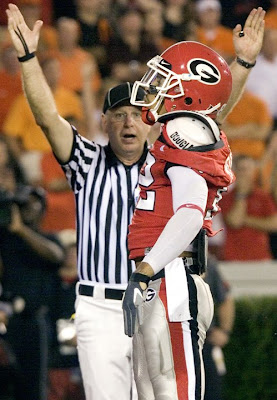
Often we make shots knowing full well that we'll be cropping the image, because there is no in-camera solution. Perhaps the moment is too quick and immediate, perhaps we just can't get closer, perhaps we're caught with one lens on the camera when another would have been more optimal. Like UGA's Michael Moore standing before the fans after he scored against Oklahoma State in the 2007 home opener. When shooting sports, you often make a best guess on the lens you have up and ready, and hope you can switch to another camera with another lens quickly if necessary. I was along the end zone shooting with a 70-200mm, and was holding it horizontally. I knew immediately that I would crop this image vertically to enhance Moore's body language and the referee's touchdown signal. That's the storytelling piece of this frame. (And I didn't get a good shot of the catch. Oh well).


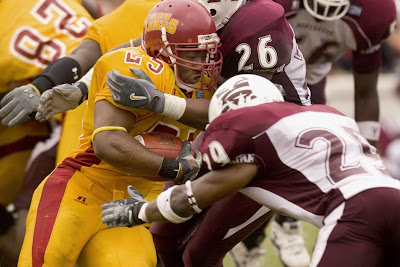
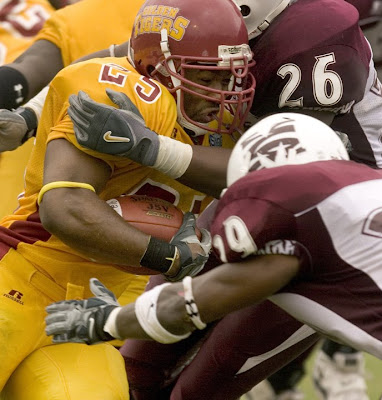
Although this Tuskegee/Morehouse photo is okay full frame, cropping it emphasizes the running back's face as he plows into Morehouse defenders. The eye is inside the action.

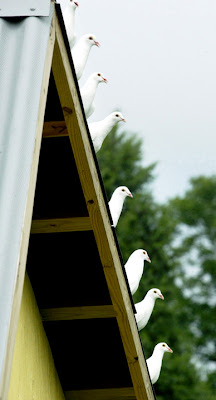
Sometimes the desired crop is subtle, sometimes it's more bold. The pigeons along the A-frame out-building is a tight crop to bring all the lines of the image into play. Anything else in the photo would have taken away from the composition.


Above, cropping out the sky brings us closer to McKenzie Johannes' wingspan. I could have cropped in even more, but it began to look awkward to bring the birds' tail too close to the bottom of the frame, and to crop in any more on her legs. But the longer horizontal composition accentuates the horizontal nature of the image.


Now, our Russell County High School marching band drummer was a happy accident. I was shooting very tight with a 300mm lens, wanting to focus on individual musicians as they moved around the field. This got too tight, but I liked it. It might have been a good shot if we could see his eyes, but then again, we can really feel his concentration just as it is.


Let's look backstage at the 2006 Miss Georgia rehearsal. This image is intentionally cropped in the camera - completely. Full frame. No accident. I saw Miss Cobb County Lauren Halford watching the other contestants as they prepared to go onstage. I stayed on Lauren, and took several photos as the other women moved around her. I chose this one because I liked the shoe adjustment and the colors that surround her. We get a good feel for what's happening.


After making several portraits of Russell County pitcher Kasey Kiker (when he was drafted by the Texas Rangers and came by the office for an interview), I got to looking at this series of frames, and decided to make a deep crop - to some extent because I just wasn't satisfied with the pictures that I had made. I tilted the image a bit, and cropped in tight. Not the best way to plan a photo, but I liked the end result more than the original frame.


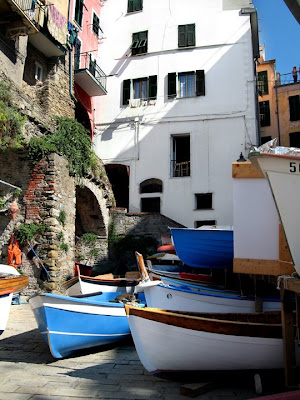
Last but not least -- here is a series of crops that were just fun to play with. You can see the many possibilities. In the first photo, we can barely see the cat asleep on the middle boat - yet she (or he) was the subject of my photo. The cat (I have three) is what caught my eye and I just loved it, sunning and sleeping. But she's tough to see in the full frame photo, so I kept playing with the crop. Fortunately, the original file size is large enough to handle so severe of a crop (but it probably would not hold up so well in making a large print).


Anyway, you get the idea. Find the cropping tool in your digital darkroom photo software ... and play around with it. Notice that you can tilt the crop box to straighten out a crooked horizon line, or to totally change the perspective of your image.

As always, have fun!
Robin

Friday, September 5, 2008

War Eagle Game Two


It was a beautiful day to kickoff the college football season. An evening start allowed plenty of time for a casual beer or two and a couple of plates of great tailgating food .... but a lackluster 34-0 win over Louisiana-Monroe drew more than a few groans from the Tiger fans in the stadium. I watched about half of the game from the stands for the first time in about 10 years, with my buddy and Ledger-Enquirer editorial guy extraordonnaire Dusty Nix. We left the stands for the RV after the third quarter and watched the Bama game on a neighbor's television. After all these years, I am still amazed at the number of tailgating TVs at the games. Ain't this fun!


Now take care of Southern Miss ...

Rah,
Robin

Monday, September 1, 2008

Keeping Dry


What to do when Hurricane Gustav comes to town? Leave! So all that a bunch of bored kids from Louisiana can do, really, is hang out at the shelter in Russell County and poke at each other. And probably drive their parents crazy, too. Good Luck to all on the coast. Hope everyone can go home soon.

Robin

Friday, August 29, 2008

Back in the Saddle - Camera in Hand


Well, the Doc gave me the yellow light to start shooting pictures again, but only a couple of days a week. My shoulder is still grumpy and tired and not full speed, (that could describe me just kind of in general these days), but I'm glad to be back in the saddle. Here I am in early April (my shoulder surgery was May 1st) riding alongside Kaitlynn Dervan, 14, who lives in Harris County and is a state champion junior rodeo gal. She competes in the barrel racing and pole bending events. I think I'm adjusting the exposure, which can get tricky in the woods. Our videographer Joe Paull (who is a filmmaker with a real job) and I worked on a story together about Kaitlynn, and he shot a few stills of me at work. I'm not an accomplished horsewoman, but my grandpa was a real-life cowboy up in the Colorado Rockies - so I figure it's in my blood somewhere.


So Tuesday I picked up my Canon 20D and a lightweight lens (17-35/2.8 mm) and photographed our two local gold medalists from the 2008 Beijing Olympics - Spc. Glenn Eller, 26, and Pfc. Vincent Hancock, 19, both members of the U.S. Army Marksmanship Unit's shotgun team. Eller won gold in the double trap event, and Hancock won in the skeet event, hitting 141 out of 145 targets. In this photo, Spc. Eller laughs as he announces that he is single after being introduced, with his teammate, at the weekly Rotary Club luncheon on Wednesday. The soldiers were greeted with a standing ovation, and Eller promptly brought down the house with his humor. Both young men were very gracious in accepting the recognition and praise of the local community.

Now, if the Doc will just green-light me to shoot football, it will truly feel like fall is just around the corner.

Hope your team wins,
Robin

Tuesday, August 19, 2008

Photo Tip #6: A Man with a Chain Saw Can Shake Your Camera


My former colleague/photo chief Richard Thomason, who retired in September 2004 after 30 years of taking pictures for the Columbus Ledger-Enquirer, stopped by the house this past Sunday, chain saw in hand, to help me cut down a tree in my front yard. Well, I helped him cut down the tree. He roared, I clipped and stacked branches. It didn't take long. Richard worked the chain right off of the saw. Literally. He had to stop once to put it back in place.

It wasn't a large tree. As you see in the 'before' photo (moving day), there are (were) matching trees, possibly some variety of crabapple, in the front yard. I decided, after they hit a growth spurt during the great summer rains we've had, that the scraggly bushes on stumps block the view of my house. It's a cute little 107-year old Victorian. Needs a little paint, but who doesn't. The pair had been hacked instead of pruned, are encroaching on the power lines, and upon closer examination, it's obvious that they are both a bit sickly, too.


And if you take a close look at the two photos, you might notice that they are not quite in focus. It's camera shake, and it can ruin an otherwise good photo. The little point and shoot camera that I used is small enough that, if I hold it with one hand, it moves as I press the shutter release. It just doesn't hold steady when you mash the button. So watch your hand as you shoot with a small camera. If the camera moves, your shot is out of focus. Use both hands to keep it steady.


The same holds true for the larger 35mm cameras, whether it's film or digital. As well, the shutter speed that you choose is important. So watch for the shutter speed when you shoot in any program mode. The rule of thumb is, don't shoot any slower than the focal length of your lens. For example, if you have a 200mm lens on the camera, set the shutter speed to 250th of a second or faster. This will vary, of course, with the many zoom lenses that are on the market. You probably cannot hold a 35-300mm lens still at a 30th of a second when you shoot at the 35mm focal length. The longer the lens, and the heavier the lens, the harder to hold it still. Either increase the shutter speed, or use a monopod or tripod.

Here's a tip on how to properly hold your camera: as you grip the camera with your right hand, cradle the bottom of the camera body with the palm, or butt, of your left hand. It gently rests there. Your thumb and fingers now lightly cup the lens from underneath, making it easy to move the focusing rings, and zoom in and out. Don't squeeze the camera with all of your might using just your right hand, then hover your left hand over the lens to move the rings. It's awkward. Trust me. Once you become accustomed to holding your camera with both hands, not only will you look like a pro, you'll shoot more like a pro.

And a few more tips to help you stay steady, especially in low light:
** breathe slow and easy, shoot on the exhale, or lightly hold your breath, like a sharpshooter
** depress the shutter button smoothly and easily, like a sharpshooter
** hold your elbows in close to your body if you need to steady yourself
** lean against a wall, or a table top, or place your elbows on your knees if seated. The idea is to make a tripod out of your body.
** set the camera on a flat surface - you can still look through the viewfinder

HOLD THAT CAMERA STILL!!!
Robin
 
Free Blog CounterEnglish German Translation